-
[ios/Swift] TableView 응용하기Study/ios 2023. 3. 19. 16:19
저번 테이블 뷰 기본편에 이어서 이번엔 테이블 뷰를 조금 응용하는 법을 공부해 보겠다.
[ios/Swift] TableView 사용법 - 기본
tableview는 다른 언어에서 리스트뷰와 같다. 사용법은 두가지가 있는데 tableview controller를 통으로 사용하거나 view controller에 테이블뷰를 부분 포함시켜서 사용한다. 이번에는 테이블뷰를 부분 포
eunduk2.tistory.com
먼저 섹션을 나눠 사용하는 방법을 정리해 보겠다.
2개의 섹션으로 구성하여 테이블 뷰를 구성해 보겠다.
남자아이, 여자아이 2개의 문자열 배열을 만들어 주고..
var student1: [String] = ["짱구", "철수", "훈이"]
var student2: [String] = ["짱아", "유리", "예슬"]
위 두 배열을 가지고 두 개의 섹션으로 나눠 볼 것이다.
섹션의 수를 반환하는 함수
// 2개의 섹션
func numberOfSections(in tableView: UITableView) -> Int {
    return 2
}
그리고 각 섹션의 헤더 제목을 지정해주는 함수
func tableView(_ tableView: UITableView, titleForHeaderInSection section: Int) -> String? {
    if(section == 0) { // 첫 번째 섹션
        return "남자아이"
    } else { // 그 외의 섹션
        return "여자아이"
    }
}
이제 각 섹션의 row(셀)의 수를 반환해주는 함수를 아래와 같이 정의한다.
func tableView(_ tableView: UITableView, numberOfRowsInSection section: Int) -> Int {
    if(section == 0) { // 첫 번째 섹션
        return student1.count
    } else { // 그 외의 섹션
        return student2.count
    }
}
마지막으로 셀의 레이블에 학생들의 이름을 맞게 할당해주면 끝이다!
func tableView(_ tableView: UITableView, cellForRowAt indexPath: IndexPath) -> UITableViewCell {
    let cell = tableView.dequeueReusableCell(withIdentifier: "TableViewCell") as! TableViewCell

    if(indexPath.section == 0) {
        cell.label.text = student1[indexPath.row]
    } else {
        cell.label.text = student2[indexPath.row]
    }

    return cell
}
실행해보면 아래와 같은 결과를 얻을 수 있다.
이번에는 위 테이블 뷰를 가지고 슬라이드 삭제 및 편집 기능을 구현해 보겠다.
아래와 같이 2개의 함수를 정의해준다.
// 삭제 기능
func tableView(_ tableView: UITableView, commit editingStyle: UITableViewCell.EditingStyle, forRowAt indexPath: IndexPath) {
    if editingStyle == .delete {
        // 학생 배열에서 삭제
        if(indexPath.section == 0) {
            student1.remove(at: indexPath.row)
        } else {
            student2.remove(at: indexPath.row)
        }
        // 테이블 뷰에서 삭제
        tableView.deleteRows(at: [indexPath], with: .fade)
    }
}
// 슬라이드시 뜨는 문구
func tableView(_ tableView: UITableView, titleForDeleteConfirmationButtonForRowAt indexPath: IndexPath) -> String? {
    return "삭제"
}
셀을 슬라이드 하여 삭제하거나 편집 모드에서 삭제 버튼을 터치하면 위 첫 번째 함수가 발동한다.
먼저 삭제한 셀의 학생을 배열에서 삭제한 후 테이블 뷰에서도 삭제한다. (순서 중요)
슬라이드 삭제시 모습
다음으로 편집 모드를 사용하기위해 편집 버튼을 추가하고 액션 함수를 구현해 주었다.
@IBAction func onEdit(_ sender: UIButton) {
    if table.isEditing {
        sender.setTitle("편집", for: .normal)
        table.setEditing(false, animated: true)
    } else {
        sender.setTitle("확인", for: .normal)
        table.setEditing(true, animated: true)
    }
}
편집 버튼을 터치하면 편집 모드가 활성화 되고 버튼 텍스트는 확인으로 바뀐다.
반대로 편집 모드에서 확인 버튼을 터치하면 편집 모드가 비활성화되고 버튼 텍스트는 편집으로 다시 돌아온다.

편집 모드가 활성화 된 모습
삭제 버튼을 통해 셀을 삭제하면 위에서 구현했던 삭제 함수가 호출된다.
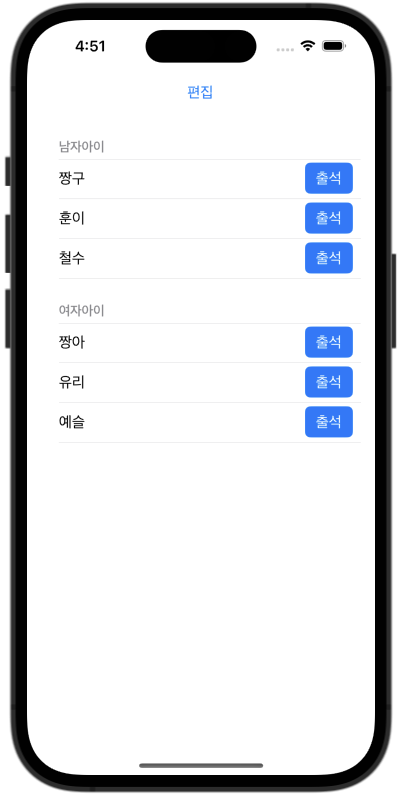
편집 모드가 활성화되면 오른쪽 햄버거 아이콘을 통해 셀의 순서를 변경할 수 있다.
셀의 순서를 바꾸면 테이블 뷰 상에서만 바뀌기 때문에 데이터 소스에서도 바뀌게 처리해줘야 한다.
// 셀 순서 변경될 때 호출
func tableView(_ tableView: UITableView, moveRowAt fromIndexPath: IndexPath, to: IndexPath) {

    if fromIndexPath.section == 0 { // 남자아이 섹션
        let movedStudent = student1[fromIndexPath.row] // 옮기려는 셀 정보 저장
        student1.remove(at: fromIndexPath.row) // 옮기려는 셀을 배열에서 삭제하고
        student1.insert(movedStudent, at: to.row) // 옮긴 곳의 인덱스로 배열에 다시 저장
    } else { // 여자아이 섹션
        let movedStudent = student2[fromIndexPath.row]
        student2.remove(at: fromIndexPath.row)
        student2.insert(movedStudent, at: to.row)
    }
}
훈이와 철수의 위치를 변경해봤다.

배열을 print해봤는데 순서가 잘 바뀐 모습
여기까지 테이블 뷰 응용에 대한 글을 마치겠다!
'Study > ios' 카테고리의 다른 글
[Swift/Study] 옵셔널이란? (0) 2023.06.28 [ios/Swift] TableView 에서 delegate pattern 사용하기 (0) 2023.03.26 [ios/Swift] TableView 사용법 - 기본 (0) 2023.03.19 [ios/Swift] 객체의 속성으로 객체배열 정렬하기 (0) 2023.03.12 [ios/Swift] UserDefaults객체에 객체배열 저장하고 가져오기 (0) 2023.03.12